Video Walkthrough
How to Create Admins and Configure Admin Privileges
Introduction
Creating admin users and managing their privileges in the LMS ensures that your LMS is well-organized and securely managed. Admins and Super Admins have critical roles in managing LMS students, pages, features, and settings. This guide will walk you through the process of creating an admin user and adjusting their admin privileges.
Creating an Admin User
- Start from the LMS dashboard.
- Navigate to the "Quick Actions" option in the top left corner.
- In the "Quick Actions" dropdown menu, select "Create User".
- Fill out the profile information for the new user.
- Scroll and go to the "User Permissions" section on the same page.
- Toggle the "Grant admin role" switch. An "Admin Permissions" pop-up will appear.
- In the pop-up, set the admin type by selecting Admin or Super Admin from the dropdown menu. You may optionally send a notification to the user informing them of the changes.
- Click the "Apply" button on the pop-up to proceed.
- To save your changes, click "Save changes" on the bottom left corner of the profile page.
- Confirm the user is now an admin by visiting the LMS Admins page from the LMS left-side panel.
Note: A Super Admin will have access to Account Settings and/or Portal Settings, including the ability to manage custom fields, form settings, SSO, and MFA, among other possible settings. Super Admins are the highest level admin type in the LMS. (See our supplementary article on differences between standard Admin and Super Admin user types.)
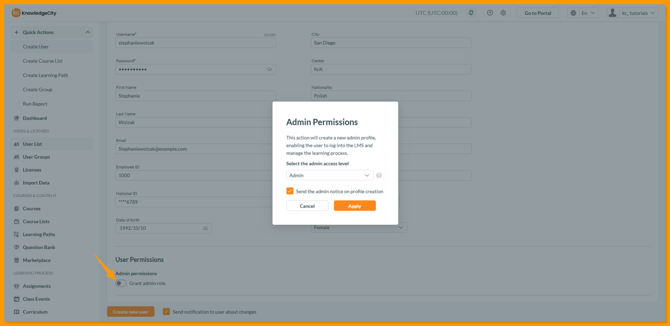
An example illustration for enabling admin permissions for a student user in the LMS.
Accessing the LMS Admins Page
The Admins page of the LMS is a pivotal tool for administrators to manage the system efficiently. This tutorial provides a comprehensive guide on how to utilize all its features effectively.
To access the LMS Admins section, simply click on the Admins link in your sidebar. This will direct you to the main page tailored for administrator management.
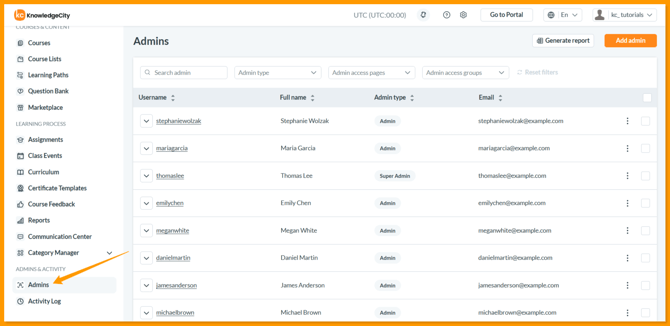
An example illustration displaying an overview of the Admins page of the LMS.
Features of the LMS Admins Page
Overview
- Administrator List: View a complete list of all administrators in the account.
- Create Admin Button: Add new administrators by clicking this button.
- Generate Report Button: Export the list of administrators to an Excel file.
- Actions and Expand Buttons: These buttons provide additional management settings for each administrator listed.
Admin Details
- Username: Clickable link if the administrator is also registered as a student.
- Full Name: Visible for easy identification.
- Admin Type: Specifies the type of administrator (Admin or Super Admin)
Managing Administrators
- You can search administrators by username, full name, or email.
- Filters are available to sort by Admin type, Admin access pages, and Admin access groups.
Adding an Administrator
- Add Admin button: Opens a modal for filling out administrator details.
- Grant admin role to the existing user: Check this box to select an existing student and grant them administrator access.
- Admin role: Choose between "Admin" or "Super Admin"
- Username: Must be 4 to 200 characters long.
- First name and Last name: Enter the administrator’s full name.
- Email: Must be a valid email address.
- Password: Set according to security criteria in account settings.
- Create user profile: Optionally creates a student profile and assigns it to a selected group.
- Notify user about changes: Automatically sends an email notification to the administrator upon profile creation.

An example illustration for creating a new admin within the Admins page of the LMS.
Generating Reports
- Generate Report button: Clicking this generates a detailed report of administrators including usernames, emails, admin types, access modes, and group names.
- Viewing Reports: After generation, you can navigate to the "Reports" section to view or download the comprehensive administrator data.
Editing Admin Access and Roles
- Access Details: View and manage specific access rights to user groups and LMS sections by clicking the expand button.
- Editing: Utilize the pencil edit button for modifications.
- Roles and Permissions: Change roles of other administrators and manage their access to different LMS sections and groups.
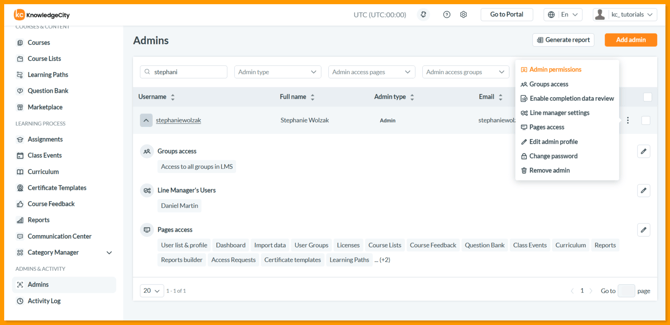
An example illustration for editing an admin within the Admins page of the LMS.
Changing Passwords
- Change password option: Allows administrators to reset the password for any administrator within security criteria set in account settings.
Deletion and Archive Options
- Remove admin: This option allows you to remove an administrator and includes options to archive their related student profile and notify them via email about account removal.
Best Practices & Tips
- Regular Audits: Conduct periodic reviews of administrator roles and access to ensure security and proper functionality.
- Access Privileges: Ensure access privileges are updated accurately when admins’ roles or responsibilities change.
- Security: Strong passwords significantly reduce the likelihood of unauthorized access. Admin accounts often have access to sensitive information and critical system functions.
For additional information, see our supplementary article on differences between standard Admin and Super Admin user types.
Conclusion
This feature in the LMS enables you to tailor admin privileges to match the specific requirements of your organization. By doing so, it guarantees that administration and oversight are assigned with accuracy and responsibility.