User List
The purpose of the User List is to view, create, and manage LMS users. It is where LMS Admins can add new users to the LMS, manage user profile information, view student assignments, and more.
The purpose of the User List is to view, create, and manage LMS users. It is where LMS Admins can add new users to the LMS, manage user profile information, view student assignments, and more.
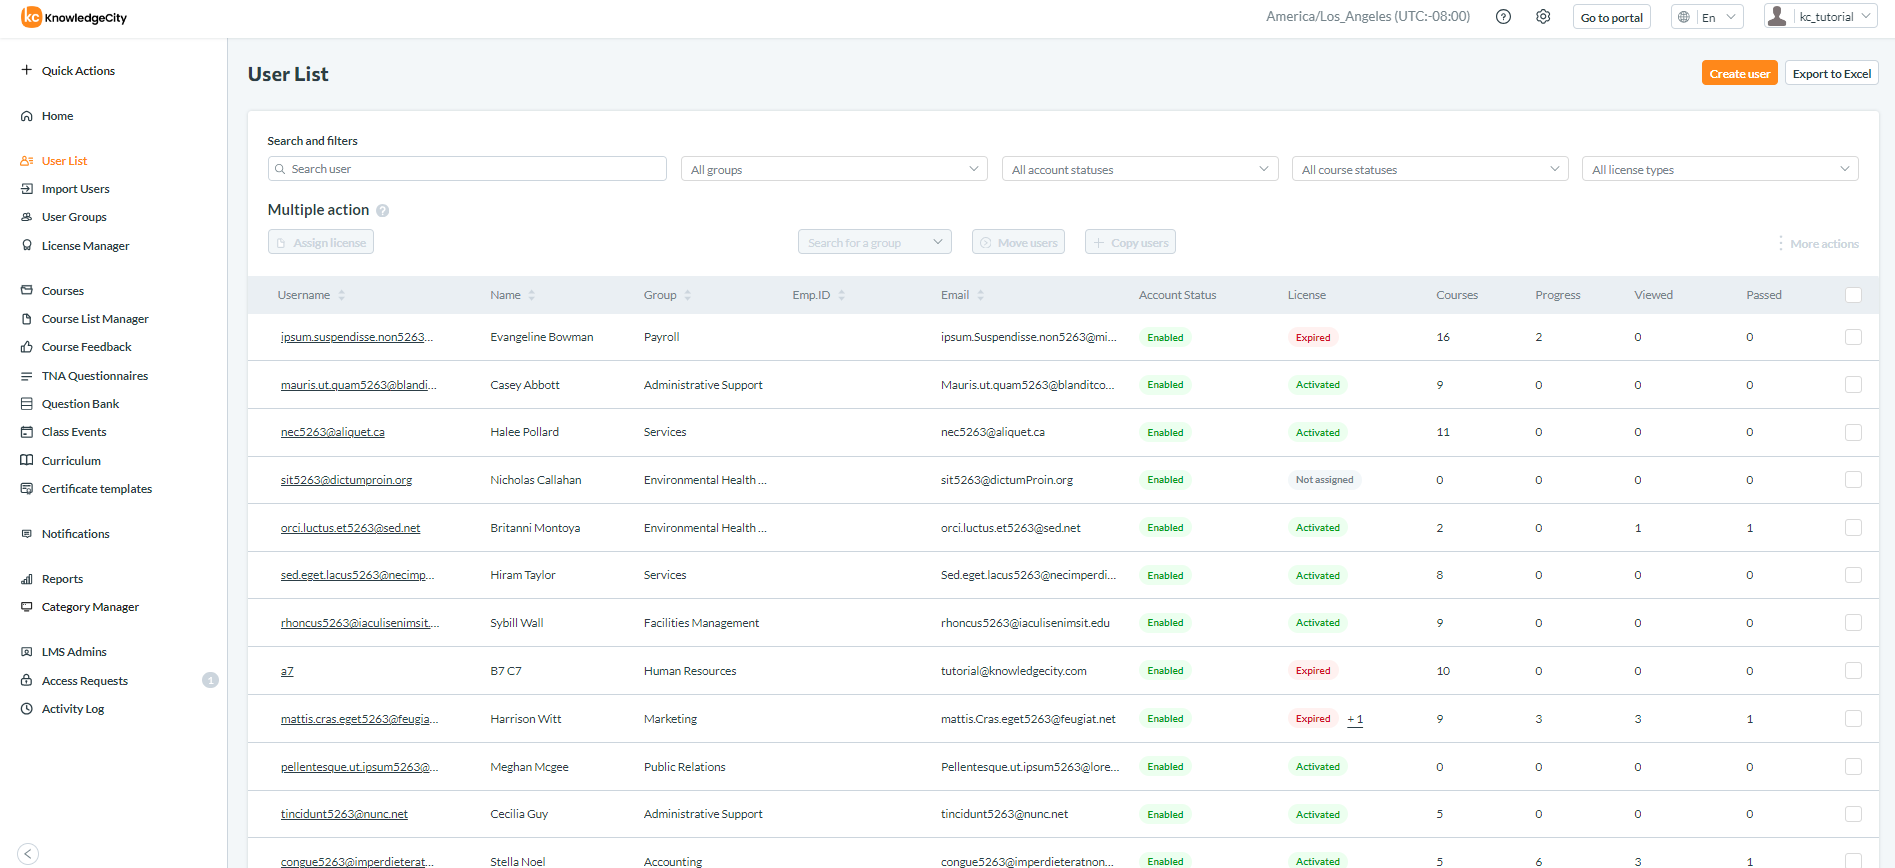
The KnowledgeCity LMS User List
In the User List, a toolbar is located at the top with options, the “Create user” button allows Admins to create new users and the “Export to Excel” button allows the Admin to export a report of the current User List.
The User List includes search and filter options that allow users to search for specific users, groups, statuses, and license types. Bulk actions options are available such as "Assign license", as well as "Move users" and "Copy users", which allows users to be added to new groups.
A table with columns exists for:
"Username", "Name", "Group", "Employee ID”, "Email", "Account Status", "License", "Courses", and "Progress", which display information pertinent to each user's account, such as their name, which group they belong to, their Employee ID, email address, status of the user, the user’s license license, the number of courses they are enrolled in, and the user’s current progress in those courses.
The "Learning Path" tab in the User List allows for the management of an individual student's learning path within the Learning Management System (LMS). This powerful tool enables administrators to assign specific courses or learning paths and monitor the student's progress through the assigned materials. Below is an overview of the "Learning Path" feature and instructions on how to use it:
How to Assign Courses to a User
- Navigate to a user profile, select the "Learning Path" tab, and then go to the "Courses" sub-tab.
- Click the "Add courses" button to open the form for assigning new courses.
- Choose courses from the list. You will only be able to select courses that have not already been assigned to the user.
- Optionally, set start dates, end dates, and due dates for each chosen course. You can do this on an individual basis or apply dates to all selected courses at once.
- You can remove a course if needed by clicking the basket button.
- Check the "Notify users" button if you wish to send a notification to users about the assignment.
- Click "Assign and save" to confirm the course assignments.
How to Assign Learning Paths to a User
- Within the user profile, switch to the "Learning Path" tab (may also be referred to as "Assignments"), and then to the "Learning paths" sub-tab.
- Click the "Add learning path" button to open the form for assigning learning paths.
- Select the desired learning paths from the list (LPs that have been previously assigned won't be available to choose).
- Similarly, you can set dates for each selected learning path.
- Check the "Notify users" button if appropriate.
- Click "Assign and save" to finalize the assignment of learning paths.
How to View and Manage Assigned Courses
- In the user profile under the "Learning Path" tab, go to the "Courses" sub-tab to see the list of assigned courses.
- You can filter courses by name or ID, and change start/end/due dates as necessary.
- To view or reset a user’s progress on courses, click the corresponding buttons.
How to View and Manage Assigned Learning Paths
- Navigate to the "Learning Path" tab of the user profile and click on the "Learning paths" sub-tab for an overview of assigned learning paths.
- You can filter learning paths by name and adjust dates if needed.
- To view detailed progress or cycles within a learning path or to reset progress, use the corresponding buttons provided.
Finally, administrators can unassign courses or learning paths as necessary for one or multiple selections by clicking the corresponding buttons. When managing users' assignments, the LMS provides options to tailor the learning experience to specific needs and track the progress of each assignment effectively.
Creating a Single New User
To create a new user in the User List, follow these steps:
- Navigate to the main page of the LMS User List.
- Click the button at the top of the page labeled "Create user".
- Fill out the necessary information for the new user. Typically, this will include:
- Login Name
- Password
- First Name
- Last Name
- Employee ID (if applicable)
- National ID, Date of birth, City, Center, Nationality, Company, Department, Position, and Phone (if applicable)
- Email (when enabling Admin user permissions, Email is required)
- Password (sometimes generated automatically)
- Any additional fields required by your LMS such as user permissions, groups, additional information, timezone, or other applicable fields.
- Ensure that all mandatory fields are completed. These are often marked with an asterisk (*) or highlighted in some way. You may also have optional fields depending on the customizations set within your LMS.
- After entering all user details, look for the button labeled “Create user", located at the bottom of the page.
- Optionally, there is an option for “Do not notify user on save”. When checked, this will not inform the user by email that the new LMS profile has been created.

Creating a New User in the LMS
Course Statistics
The "Course Statistics" feature in the User List is an insightful subsection within the user's profile that allows administrators or educators to observe and analyze a student's interaction with the courses they have undertaken. Here is the step-by-step process to use the "Course Statistics" functionality:
Accessing Course Statistics
- Go to the User List page, select a user and access their profile by clicking on the user's name.
- Click the "Course Statistics" tab to view the user’s course interaction data.
Understanding Course Information
- This page displays information about all the courses that the user has started, except those removed from the system.
- Courses currently assigned to the user are marked with a special icon for easy identification.
- Courses with history are courses that have been started by the user at any time, whereas assigned courses are those actively assigned.
Searching and Filtering
- If needed, you can search courses by name or ID.
- Filtering options include viewing all courses with history, only assigned courses, by progress statuses, and categories.
Resetting Progress
- To reset progress for courses, click the "kebab" (three vertical dots) icon next to a course, then select the "Reset progress" button.
- You can also reset progress for multiple courses at once by checking the boxes, next to the desired courses and clicking the "Reset progress" button at the top of the table.
- Please note that you cannot reset progress for courses that have a "Not started" status.
Certificates and Course Cycles
- To view the certificate from the last course cycle, if available, click the "kebab" icon and then the "Certificate" button. Certificates are only available for courses with the "Passed" status.
- To examine course cycles, click the "Course cycles" button or click directly on the course name.
- On the Course cycles page, if certificates are available for these cycles, you can view them by clicking the "Certificate" button.
- To delve into details about a specific course cycle, click its name to reach the Cycle History page, where you can also export the information by clicking the "Generate report" button.
- Information about a certification quiz, if available, can be viewed by clicking its name.
How to Archive Users
- Select Users: Select the users you wish to archive by checking the boxes next to their names in the User List. The checkboxes will be found on the right-hand side of the page.
- Archive Users: Click on the 'Archive user(s)' action. A confirmation pop-up will appear to ensure you understand the consequences of this action.
- Confirm Action: Click 'Archive' in the confirmation pop-up. If the user has an active license from a rotational subscription, it will be automatically unassigned.
- Archived Status: The system will close access to the portal for these users, but their data will remain intact, ensuring no other user can be created with the same username. A success message will be displayed confirming the archiving process.
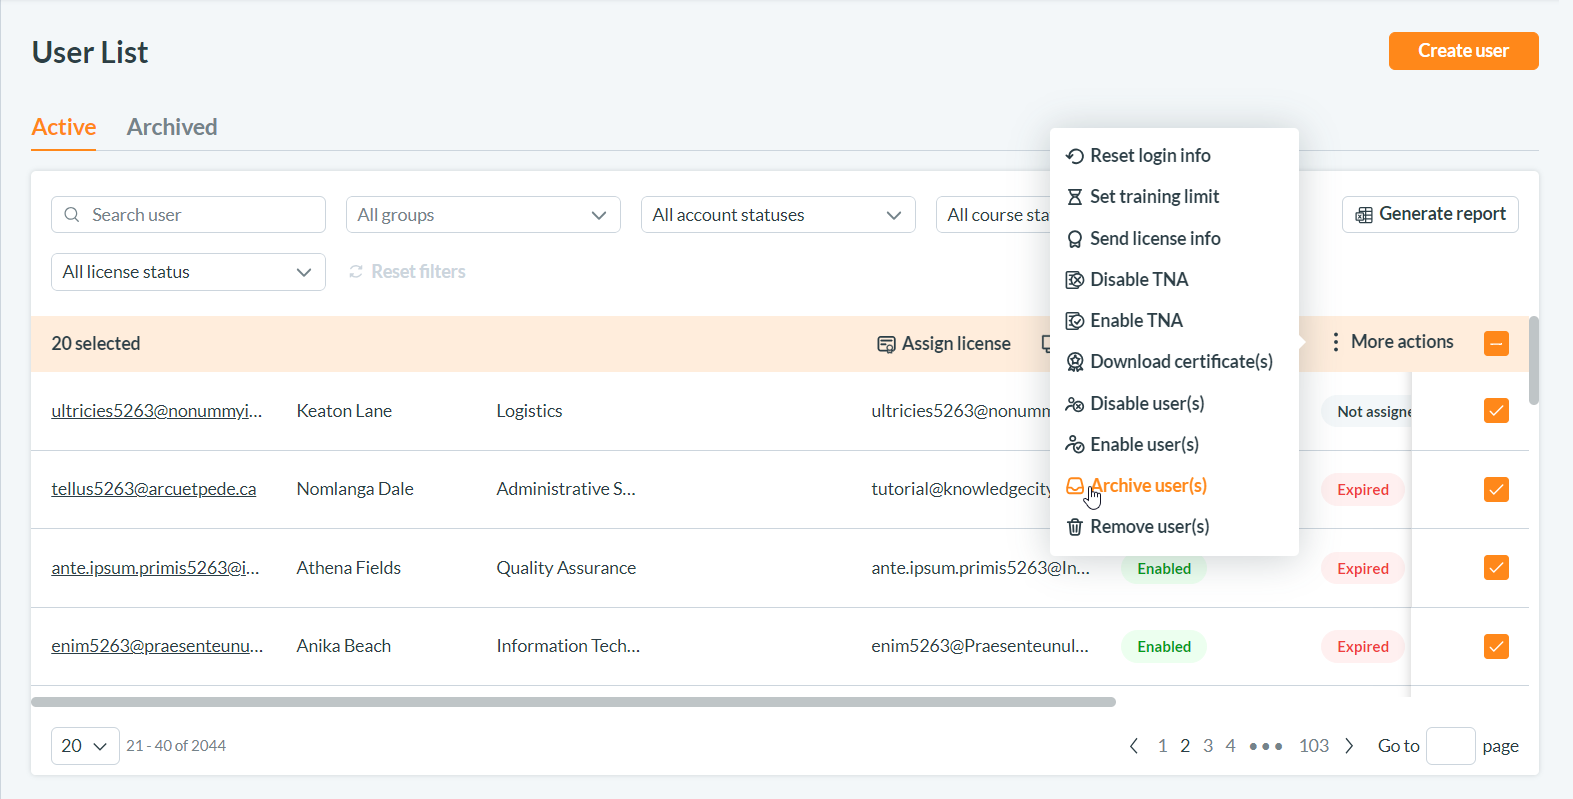
An example illustration demonstrating how to bulk archive users in the LMS User List.
Differences Between Archived and Active Users
Active Users:
- Access: Active users have full access to the LMS, including all assigned resources and courses.
- Modifications: Admin can freely modify the account status, assign or remove licenses, and adjust user group memberships.
- Status Indicators: Active users may have various statuses such as 'Enabled' or 'Disabled' indicating their current access level to the LMS services.
Archived Users:
- Access Restrictions: Archived users cannot access the LMS. Their accounts are kept in a dormant state within the system.
- Data Retention: Although they cannot log in, the data and records associated with archived users remain in the system. This includes historical data on course completions and any assigned licenses up until the time of archiving.
- License Unassignment: If archived users had active rotational subscriptions, these would be automatically unassigned during the archiving process to free up resources .
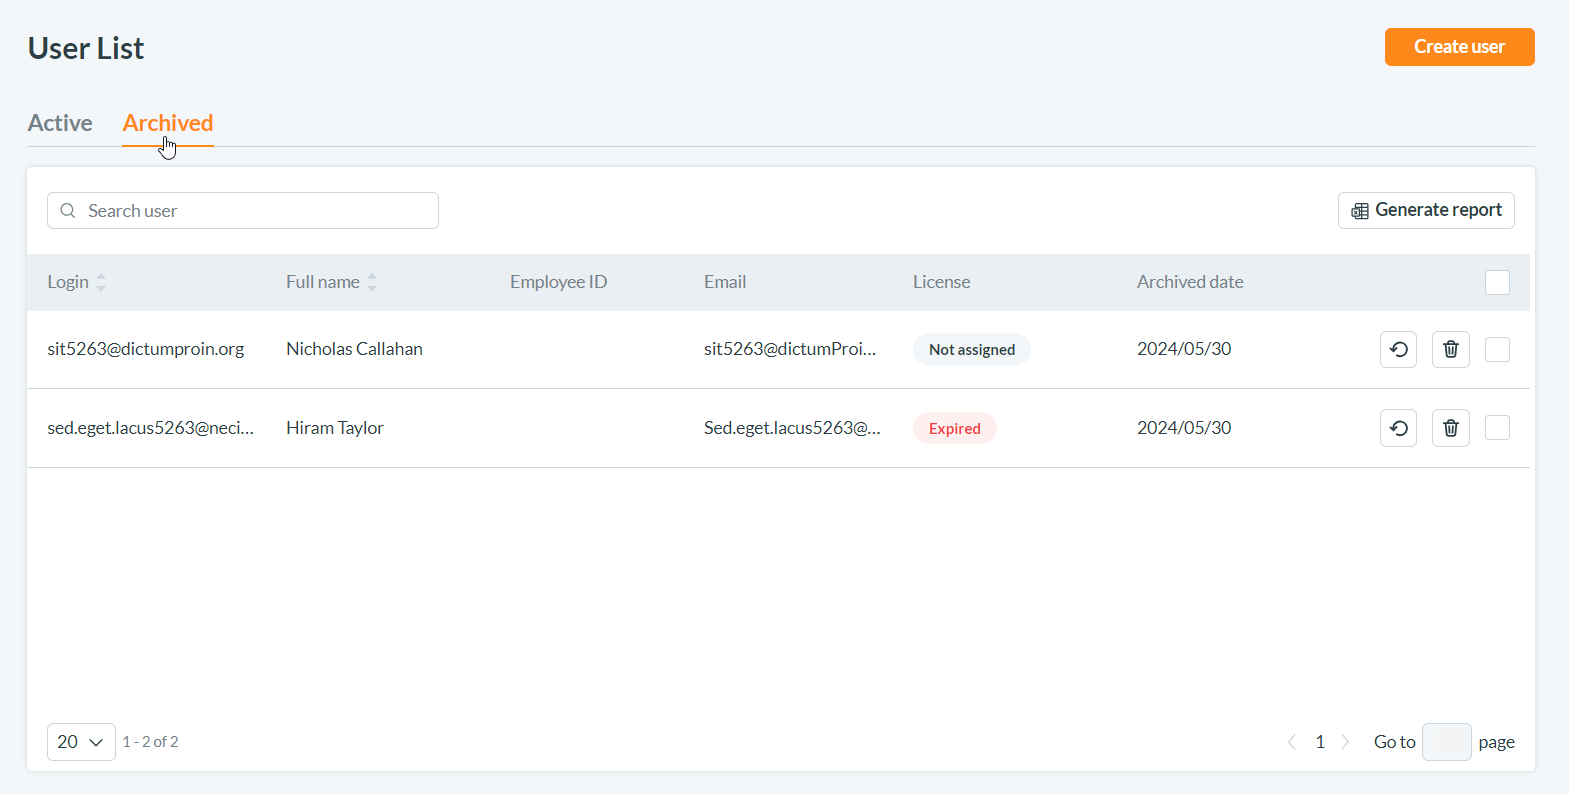
An example illustration of the "Archived" tab of the LMS User List.
How to Remove Users
Users can be removed individually or with bulk-select within the LMS User List from either the "Active" tab or the "Archived" tab.
- Select Users: Select the users you wish to remove by checking the boxes next to their names in the User List. The checkboxes will be found on the right-hand side of the page.
- Remove Users: Click on the 'Remove user(s)' action. A confirmation pop-up will appear to ensure you understand the consequences of this action.
- Confirm Action: Click 'Remove' in the confirmation pop-up.
- Deleted Status: Removed users will no longer have access to the portal and their records will be removed from the LMS. At this point, the users are considered removed or deleted. Removed users will no longer be found in the User List.
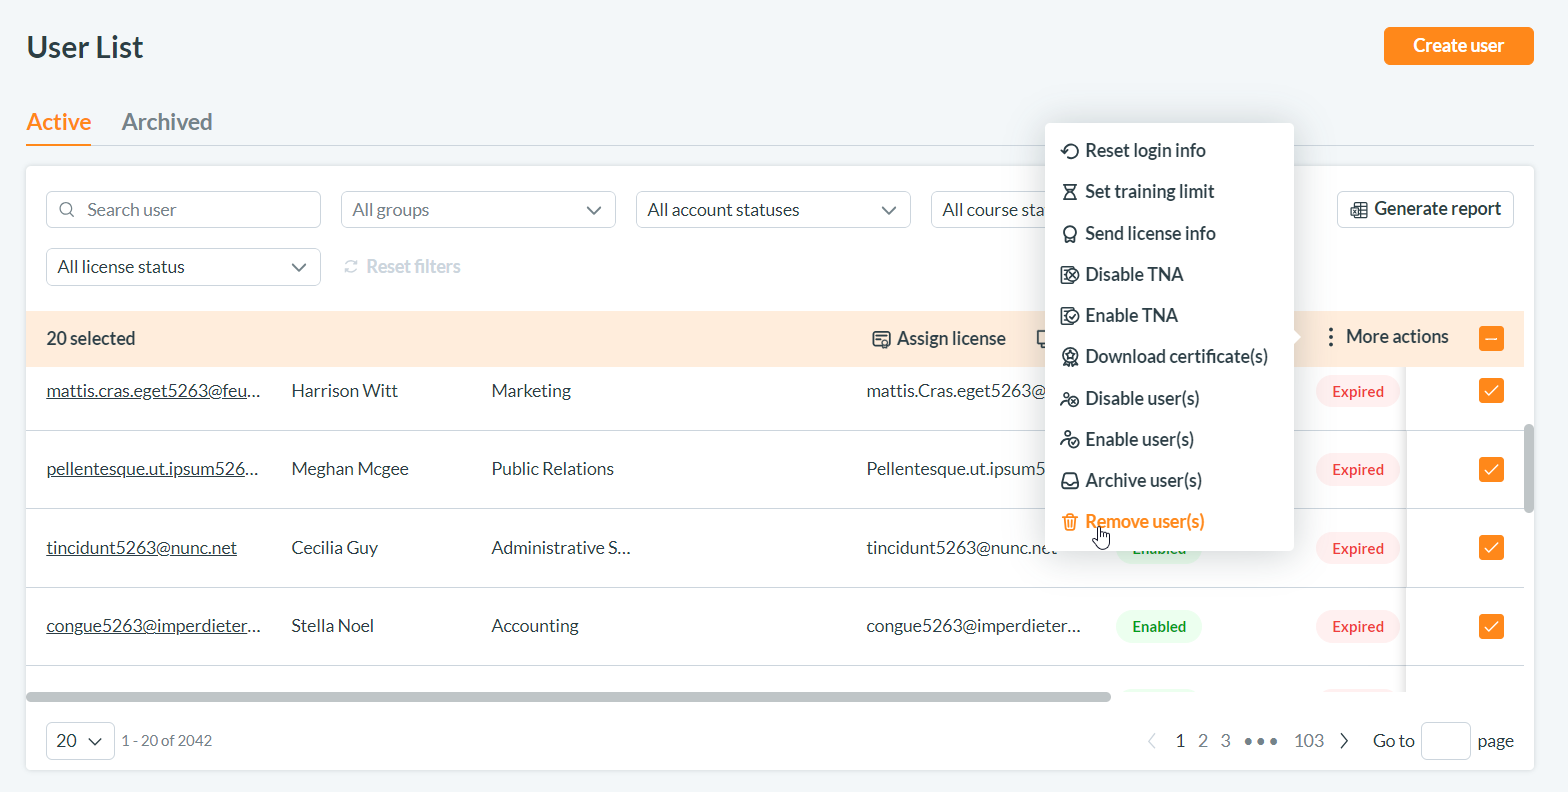
An example illustration demonstrating how to bulk remove users in the LMS User List.
Restoration Possibility:
- Restoring Users: Administrators have the capability to restore archived users if needed. Upon restoration, if the user does not have an active license, the system will notify the admin, giving an option to assign a new license. Removed users should be considered unrecoverable and the administrator must understand the consequences of these actions to their learners.
The User List feature is essential for adding, managing, removing, editing users and user information in the LMS. With the User List, licenses can be assigned for course access, users can be assigned to groups, and reports can be generated for your user base. The feature allows admins to track and support a student's learning journey, enabling both a comprehensive view of their current course assignments (learning paths and individual course assignments) as well as a history of their course engagements and achievements (statistics and course cycles).
Happy Learning!