Introduction
The Courses feature of the KnowledgeCity LMS allows you to create and manage courses for your learners. The final phase of course setup involves adding assessments and supplementary materials. This guide walks you through configuring the final Certification Test, attaching supplementary Course Files for learners, and uploading Subtitles for video lessons to ensure accessibility and a complete learning experience.
Configuring the Course Files, Certification Test & Subtitles
This guide covers the final steps to complete your custom lesson course. Once your course structure and content are in place (as covered in Creating a Custom Lesson Course in KnowledgeCity LMS & Adding and Structuring Content to Your Lesson Course), you can add supplementary resources and configure the final assessment.
Follow the steps below to access these tabs:
- Navigate to the Courses > Custom page.
- Click on your newly created course from the list to open its course details page.
- You will configure the final elements using the tabs at the top of the course details page:
-
Course Files (for supplementary course files)
-
Certification test (for the final assessment)
-
Subtitles (for video lesson accessibility)
-
Course Files
Supplementary course files can be included within the course and displayed to learners within the course page. This is an optional feature to supplement your course material.- Navigate to the "Course Files" section, this is used to upload attachments for the course page.
- Click "Upload File" to upload files in the following formats: .zip, .pdf, .jpg, .png, .mp3, .mp4, .pptx, .ePUB
- Configure "Access to File" settings:
- Open: The file is publicly accessible.
- Restricted: Only users with access to the course can view.
- Use language toggles to control:
- File visibility in different language versions.
- File naming for each language.
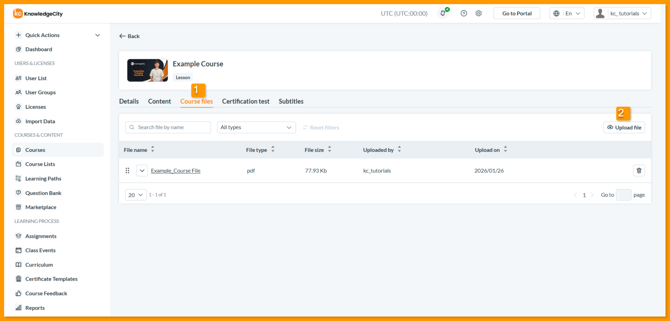
An example illustration highlighting the "Course files" tab of the course where supplementary course files can be added, managed, or removed.
Certification Test
The Certification Test is used as a final test covering all provided course material.
- Navigate to the "Certification test" tab of the course details page.
- Language-specific questions and answers can be applied using the language tab selection.
- To begin adding questions and answers to the Certification test:
- Manually Add Questions: Click the "Add question" button to create a new question, specifying:
- Question title
- Answer options
- Correct answers (mark the correct ones)
- "Can be shuffled" (optional)
- Import from Question Bank: Click the "Question bank" button to import from a pre-existing bank. Select language, category, mark questions, and click "Add."
- Manually Add Questions: Click the "Add question" button to create a new question, specifying:
- Open the "Settings" section for test settings options. Additionally, you may set the following:
-
Question limit: Set the maximum number of questions for the test.
-
Minimum passing score: Define the required score to pass the test.
-
Shuffle questions: Randomize the order of questions presented.
-
Shuffle answers: Randomize the order of choices within questions.
-
Show score: Control whether the score is displayed to the user.
-
Customize attempt limit: Enable to set a specific maximum number of test attempts.
-
Account attempt(s) limit: The specific number of attempts allowed when the above limit is enabled.
-
Limit time to duration: Enable to restrict the test to a fixed time limit.
-
Approximate duration (in seconds): The total allowed test time in seconds when the time limit is enabled.
-
Lesson bypass for certification test: Choose who can skip lessons and proceed directly to the test.
-
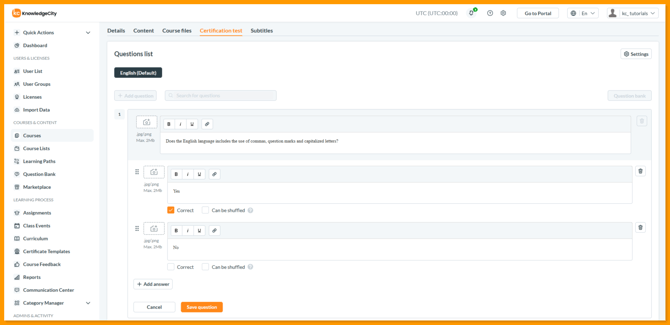
An example illustration highlighting the "Certification test" tab of the course.
Subtitles
Using the “Subtitles” tab at the top menu, subtitles and (.vtt files) can be applied to video lessons and can be set as language specific.
Navigate to the "Subtitles" tab at the top of the page, which allows you to upload subtitles for video lessons. If a course does not contain any video lessons, the system will notify you accordingly. Subtitles can be uploaded in three ways:- Selecting a Language and Uploading a File: Choose the subtitle language for the voice-over and upload the corresponding
.vttfile. - Uploading Files with a Language Prefix: Upload subtitle files with a language prefix in the file name (e.g.,
en-*lesson_name*.vtt). The system will automatically detect the subtitle language based on the prefix. - Using a ZIP Archive: Upload a ZIP archive containing subtitles organized as per the provided template. The system will automatically import the subtitles into the respective lessons. Once uploaded, click the Save button to finalize the process.
Related Articles:
-
Start Building a Course – Learn to create your lesson course, define its core details, and add multiple languages.
- Add Course Content – Populate your course with chapters and lessons.
Conclusion
By following these steps, you have successfully configured the certification test, added supplementary resources, and ensured accessibility with subtitles. Your course is now complete and ready for learners.
Publishing Your Course
Once your course is fully configured and saved, the final step is to make it available to learners. To publish your course:
-
Use the Category Manager to assign your course to a relevant category. (For detailed steps, see our guide Overview - Category Manager in the LMS).
-
This will make your course visible on your learning portal's homepage and within the learning library for enrolled users.
If you have any questions about publishing or need further assistance, your KnowledgeCity Success Team is ready to help.