Introduction
The Courses feature of the KnowledgeCity LMS allows you to create and manage courses for your learners. Once your course shell is created, the next step is to build its structure and populate it with content. This guide explains how to use the Content tab to organize material into chapters, add various lesson types (including video, quiz, SCORM, and interactive Designer lessons), and manage that content across different language versions of your course.
Adding Your Lesson Course Content
Once you have created your new course and configured course details as covered in Creating a Custom Lesson Course in KnowledgeCity LMS, you are ready to build its structure and add course content.
Follow the steps below to add chapters, lessons, and interactive content inside Content tab.
- Navigate to the Courses > Custom page.
- Click on your newly created course from the list to open its course details page.
- Select the "Content" tab at the top of the page. This is where you create the structure of your course by adding chapters and lessons.
Note: This content tab is language-specific.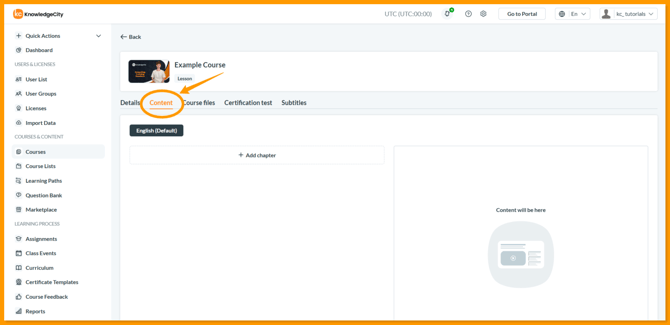
Creating Chapters
- Within the "Content" tab of the page, click the "Add chapter" button to create a new chapter.
- Enter the chapter name in the modal window and click "Save."
- To rename a chapter, click the "pencil" icon.
Note: Any changes to the order of chapters or deleting a chapter will apply to all language versions of the course.
Creating Lessons
Once inside a chapter, you can add lessons using the lesson type buttons (e.g., Lesson, Quiz, Designer, SCORM).
| Lesson Type | Description | Key Action |
|---|---|---|
| Lesson | For video, image, or PDF content. | Upload a media file. |
| Quiz | For assessments and knowledge checks. | Create and configure questions. |
| Designer | For interactive lessons using templates. | Open the KnowledgeCity Lesson Designer. |
| SCORM | For pre-packaged, interactive e-learning content. | Upload a SCORM (.zip) file. |
Adding Lesson Types
1. Lesson
- Click the "Lesson" button to upload a video or image file.
- Supported formats: .mp4, .pdf, .png, .jpg, and .gif (Video file, PDF document, or image file)
- The system will automatically detect the file format and set the lesson type accordingly.
- After uploading, configure the:
- Lesson Name: The name of the lesson.
- Status: Set the availability of the lesson.
- Runtime: Set manually for image lessons; automatically set for video lessons.
Important Note: If needed, you can replace a video lesson with a new video file or replace an image lesson with a new image file, but you cannot replace video with image or vice versa. You can delete a lesson with the "Remove" button on the lesson card or by using the bulk action option.
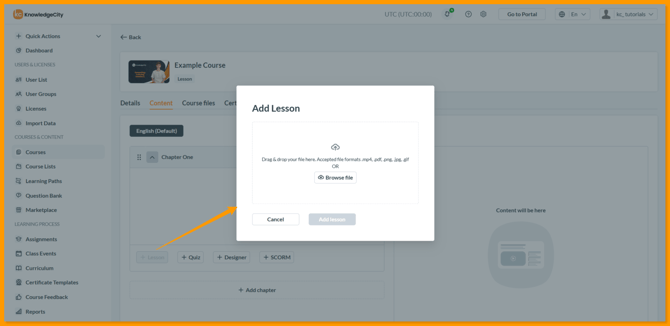
An example illustration highlighting the button to create a new "Lesson" within the new chapter of the course.
2. Quiz
- Click the "Quiz" button to create a new quiz lesson.
- Configure the Quiz name and status.
- Click "Edit" to manage quiz questions on a dedicated page. See the "Quiz Lessons" section below for more details.
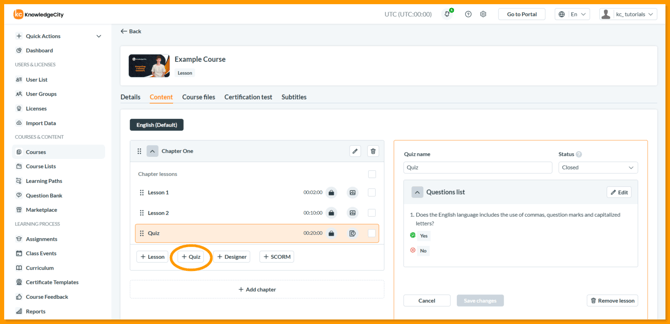
An example illustration highlighting the button to create a new "Quiz" within the chapter of the course.
After creating a quiz lesson, click the "Edit" button to manage questions. You will be redirected to a dedicated page for managing quiz questions.
Adding Quiz Questions
- Manually Add Questions: Click the "Add question" button to create a new question, specifying:
- Question title
- Answer options
- Correct answers (mark the correct ones)
- "Can be shuffled" (optional)
- Import from Question Bank: Click the "Question bank" button to import from a pre-existing bank. Select language, category, mark questions, and click "Add selected questions".
Quiz Settings
- Click the "Settings" button to customize the quiz:
- Question limit: Set the maximum number of questions displayed.
- Max number of attempts: Set the maximum attempts allowed.
- Minimum passing score: Set a minimum passing score.
- Reset course progress if number of attempts was exceeded: Option to reset course progress if number of attempts are exceeded.
- Show welcome page: Display an informational block before starting the quiz.
- Shuffle questions: Randomize the order of questions.
- Shuffle answers: Randomize the order of answer options.
- Force order: Requires users to answer questions in sequence.
- Show score: Display the score after completing the quiz.
- Show passed/not passed message: Display a message indicating whether the quiz was passed.
- Show correct answers: Allows students to see whether their answers were correct.
- Action on time out: Specify the action when the quiz timer expires.
- Show answer result mode: Configure how results are displayed.
- Limit time to duration: Set time limits for the quiz.
- Approximate duration (in seconds): Specify the approximate quiz duration in seconds.
- Start/Edit Time/Date: Set the time range for the quiz.
- Make this quiz the course certification test: Marks the quiz as a certification test.
3. Designer
Designer Lessons provide an interactive learning experience and can be developed using a selection of pre-curated templates, including:
-
- Text Question - Text Answers
- Text Question - Picture Answers
- Drag and Drop Matching - 3 Picture Boxes
- Fill in the Blank / Short Answer
- Picture Question - Text Answers
- Text/HTML Content Question - Text Answers
- Picture Area Question
- Designer: Click the "Designer" button to create a rich interactive lesson.
- Configure the Lesson name, Status and Runtime.
- Click "Edit lesson in Designer" to open a KnowledgeCity Lesson Designer to create and edit the lesson.
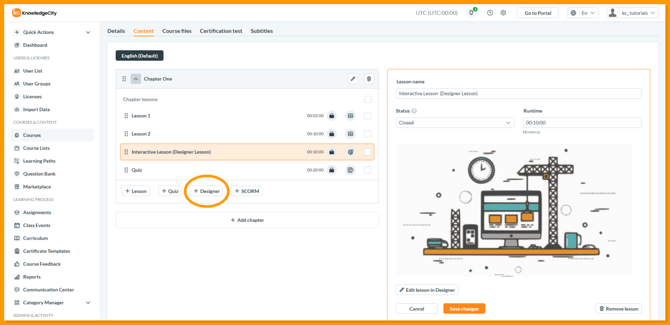
An example illustration highlighting the button to create a new "Designer" lesson within the chapter of the course.
4. SCORM
By adding a SCORM lesson, you may use a custom SCORM file package to serve as a lesson of the course.
- SCORM: Click the "SCORM" button to upload and configure a SCORM file package.
- Configure the Lesson name, Status and Runtime.
- Choose how the lesson will launch ("Launch mode"). This can be set to open the lesson in a separate window or inline within the course page.
- Upload your SCORM file package as a .zip file ("Lesson content").
- You can optionally upload a preview image ("Lesson preview")
- After completing these steps, click "Save changes" to finalize the lesson creation, or use the "Remove" button to delete if needed.

An example illustration highlighting the button to create a new "SCORM" lesson within the chapter of the course.
Managing Lessons and Language Content
Managing Lesson Order
| Action | Description |
|---|---|
| Reorder a Lesson | Drag and drop the lesson to a new position within its chapter. |
| Bulk Actions | Use bulk actions to delete multiple lessons or change their statuses simultaneously. |
Language Tabs for Lessons
Use the tabs at the top of any lesson or quiz page to manage content for different languages.
| Tab Function | Purpose |
|---|---|
| Switch Language View | View and edit the content for a specific language. |
| Edit In-Place | Create questions and change content directly without leaving the page. |
Working with Lessons in Other Language Tabs
By default, all lesson and chapter content is inherited from the default language. In this case, you need only to translate the names of the lessons and chapters into the target language.
| If you want to... | Then follow these steps: |
|---|---|
| Only translate text (Keep the same media files) |
1. Go to the language tab. 2. Update the lesson/chapter names and text. |
| Upload different media (e.g., a unique specific language video or image) |
1. Go to the language tab. 2. Open the lesson. 3. Enable "Upload custom content for this language". 4. Upload the new file. |
Related Articles:
-
Start Building a Course – Learn to create your lesson course, define its core details, and add multiple languages.
-
Set Up Final Details – Configure the certification test, course files and subtitles.
Conclusion
You have now built the core structure of your course by adding chapters, lessons, and interactive content. This allows you to tailor the learning experience with videos, quizzes, SCORM packages, and Designer lessons to meet your learners' needs. Your course is now structured and ready for final touches. For guidance on creating advanced interactive content or quizzes, your KnowledgeCity Success Team can provide immediate support.