Introduction
The Courses feature of the KnowledgeCity LMS allows you to create and manage training events for your learners. This guide covers the first step in setting up a Class course: creating the course shell and configuring its core details. You will learn how to access the courses section, create a new "Class" type course, and define essential information such as the author, difficulty level, skills, and language settings before proceeding to schedule events.
Getting Started: Creating a New Class Course
- Log in to your KnowledgeCity LMS administrator account.
- Navigate to the "Courses" section. This can be found in the LMS left-side panel.
- The 'Custom' tab of the Courses page will open. The page will display a table of existing custom courses, if any already exist, including the Course name, Course ID, and Type. For a comprehensive courses section overview, check out Overview - Understanding and Navigating the Courses.
- Click the "Create course" to start a new course
- Course name: This is a unique name you may give the new course.
- Course ID: Specify a unique ID (Course ID should begin with a letter and consist of only letters A-Z and numbers).
- Default Language: Set a default language for the new course (e.g., English or Spanish).
- Course type: Select the "Class" option to create a new custom course with class events (e.g., includes online and offline class events).
- Proceed by clicking the "Create course" button within the modal window.
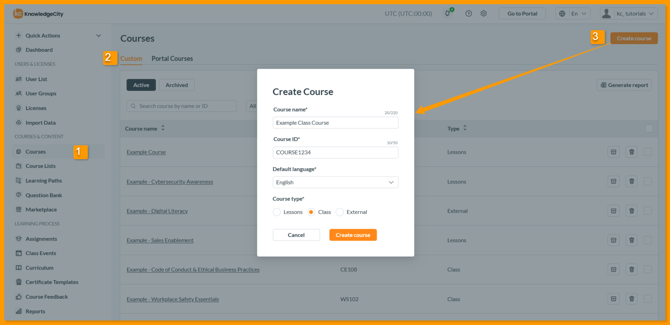
An example illustration of the "Create Course" modal for the class course creation process.
Configuring Course Details
- Once a new course is created, You will be brought to the course "Details" page of the new class course. Additional parameters can be applied here including:
-
Author: Select the name of the course creator from the dropdown menu. If the desired author is not listed, create a new one using the "+" icon.
-
Level: Choose a difficulty level for the course (e.g., Essential, Beginner, Intermediate, Advanced).
-
Skills students will learn: List the key skills learners will gain from the course.
-
Course certificate toggle: Toggle this option to enable or disable certificates upon course completion. If disabled, learners will receive a "Passed" status only.
-
Course thumbnail image: Upload a preview image that will be displayed on the course card. The image must be in .png or .jpg format, with a maximum file size of 2 MB and a recommended resolution of 1280x720 pixels.
-
Please be aware: These settings will apply to the entire course and are not affected by language versions.
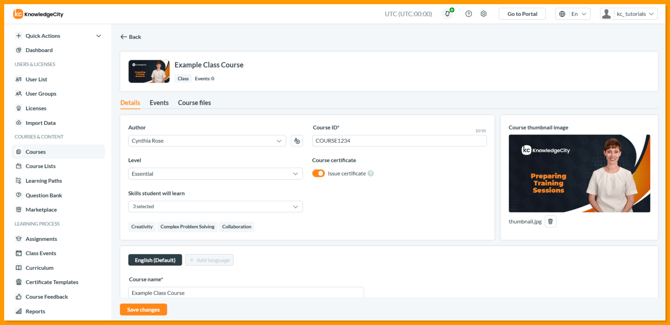
An example illustration of the "Details" tab of a newly created Class-type course.
Adding Language Versions
The default language of the course is set at course creation.
- Adding a New Language: Click the "Add language" button. In the modal window, select the desired language and confirm.
Note: Languages already added will not appear in the dropdown list. - Changing the Default Language: Navigate to the tab of the desired language, check the box "Make this language default," and then save.
- Removing a Language: Click the "Remove" button to remove a language, this is only available for languages that are not set as default.
- Language-specific Parameters: On each language tab, you can customize the following information:
- Course name: Specify the name of the course in the current language.
- Localization level: Set the level of localization for this language version.
- Tagline: Add a short tagline specific to the current language.
- Short description: Provide a brief description of the course in the current language.
- Full course description: Provide the full description of course in the current language. You can use HTML to style the description (limited to H3 headings, bold, italic, underline, hyperlinks, numbered and bulleted lists).
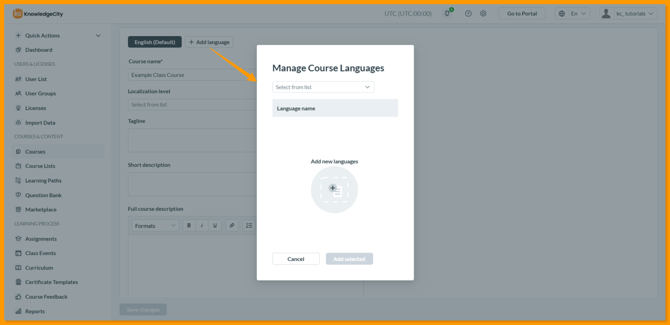
An example illustration of the "Add language" feature within the course Details tab.
Adding Custom Fields
- In addition to the default fields, you can add custom fields to the course within the “Details” tab of the course in the top menu of the page.
- At the bottom of the “Details” tab, click the "Add custom field" button.
- In the modal window, enter the field name and choose the field type (Text, Number, Date, or Time).
- After saving, the new field will be available with actions:
- "Pencil" icon to edit the field.
- "Trash can" icon to delete the field.
Important Note: Custom fields are language-specific and only appear on the specific language tab where they are created.

An example illustration highlighting the "Add custom field" button found in the Details tab of the course. A modal window appears allowing custom field creation.
Adding Course Files
Supplementary course files can be included within the course and displayed to learners within the course page. This is an optional feature to supplement your course material.
- Navigate to the "Course Files" section, this is used to upload attachments for the course page.
- Click "Upload File" to upload files in the following formats: .zip, .pdf, .jpg, .png, .mp3, .mp4, .pptx, .ePUB
- Configure "Access to File" settings:
- Open: The file is publicly accessible.
- Restricted: Only users with access to the course can view.
- Use language toggles to control:
- File visibility in different language versions.
- File naming for each language.
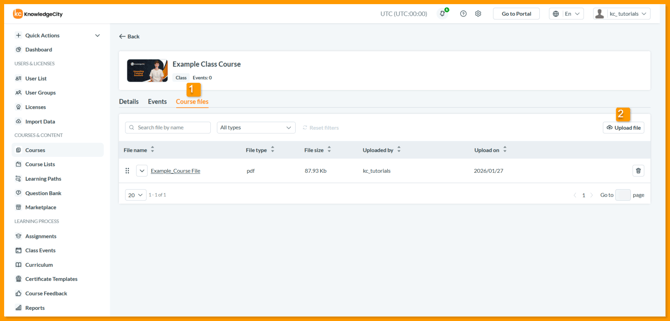
An example illustration highlighting the "Course files" tab of the course where supplementary course files can be added, managed, or removed.
What to Do Next & Related Articles:
Now that your class course shell is ready, proceed to schedule your events:
-
Scheduling and Managing Online Class Events – Set up webinars and virtual classroom sessions.
-
Scheduling and Managing Offline Class Events – Organize in person classroom training.
-
Viewing and Managing Class Event Registrations – After scheduling, learn to view and manage Participants and Attendance.
Conclusion
You have now successfully created your Class course shell and configured its foundational details. With the course framework, language versions, and core information in place, you are ready to proceed to the next phase: scheduling your training events. For assistance with any of these initial settings, your KnowledgeCity Success Team is available to help.